Set Linux Root Password with VCF Automation

We discussed how to set the Windows Administrator password at build-time with VCF Automation already, but we haven't gone over the same for Linux root password. Let's do it.
We'll use similar methodology, namely a Customization Specification. Log into vCenter and go to Policies and Profiles.

Once there either create a new one or edit your existing Linux Customization Specification.

Go to the Customization Script tab and enter the following (using whatever you want for your initial password).
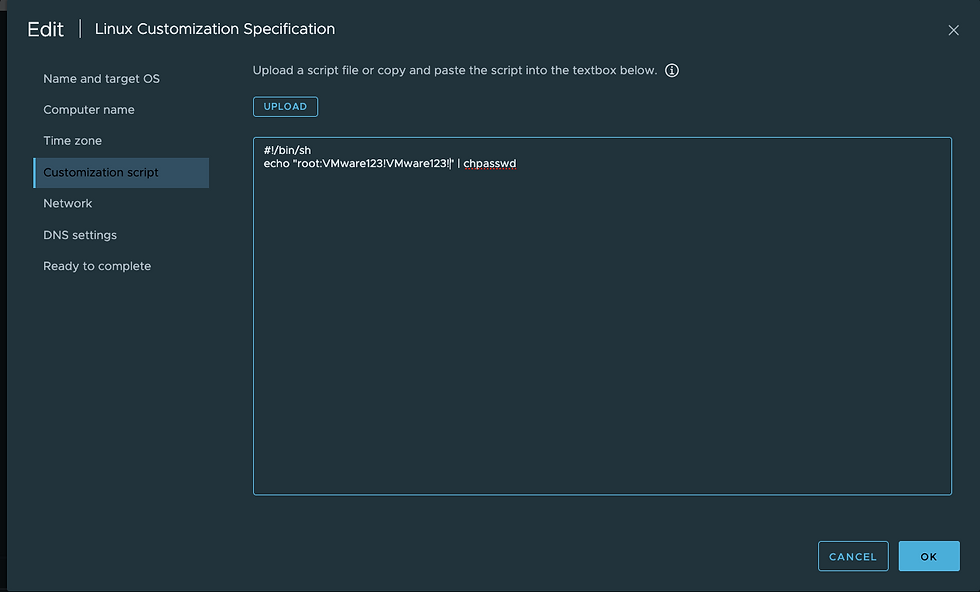
The Customization Specification will run this script at build-time, which will set the root password to whatever you've indicated.
#!/bin/sh
echo "root:VMware123!VMware123!" | chpasswd
Note: custom script execution must be enabled on the Template you are using, so you must run this command on the VM before converting it into a Template and using it in your VCFA Blueprint.
vmware-toolbox-cmd config set deployPkg enable-custom-scripts true
Mine looks like this.

Once complete, convert your VM to a Template and re-sync Template Images via Assembler - Infrastructure - Connections - Cloud Accounts.

Now let's call the Linux Customization Specification from our Blueprint, mine looks like this.
# Created by Brock Peterson
formatVersion: 1
inputs:
vm_display_name:
type: string
description: VM Display Name
title: VM Display Name
vm_dns_name:
type: string
description: VM DNS Name
title: VM DNS Name
vcpu:
type: integer
description: vCPUs
title: vCPUs
default: 2
minimum: 2
maximum: 16
enum:
- 2
- 4
- 8
- 16
MemoryMB:
type: integer
description: Memory (MB)
title: Memory (MB)
default: 4096
minimum: 4096
maximum: 32768
enum:
- 4096
- 8192
- 16384
- 32768
os:
type: string
description: OS
title: OS for VM
default: RHEL7-Template
enum:
- CentOS7-Template
- CentOS8-Template
- Debian12-Template
- OracleLinux9-Template
- RHEL7-Template
- RockyLinux9-Template
ip:
type: string
description: IP of VM
title: IP of VM
customizationspec:
type: string
description: Customization Specification
title: Customization Specification
default: Linux Customization Specification
resources:
Cloud_Network_1:
type: Cloud.Network
properties:
networkType: existing
Cloud_vSphere_Machine_1:
type: Cloud.vSphere.Machine
properties:
name: ${input.vm_display_name}
hostname: ${input.vm_dns_name}
imageref: ${input.os}
cpuCount: ${input.vcpu}
totalMemoryMB: ${input.MemoryMB}
customizationSpec: ${input.customizationspec}
networks:
- network: ${resource.Cloud_Network_1.id}
assignment: static
address: ${input.ip}
As you can see, I ask the requester for the Customization Specification they'd like to run, then apply it in the Cloud_vSphere_Machine_1 stanza. If you'd like this Blueprint you can get it here.
Requesting a RHEL VM with this Blueprint looks like this.

Once I click DEPLOY we can watch progress here.

Upon completion it'll look like this.

Over in vCenter it will look like this.

Clicking LAUNCH WEB CONSOLE will give a prompt to login. Provide the root password you set via the Customization Script in your Customization Specification and you're in!

You'll likely want to change this, but this is a nice way to set the initial root password for your Linux VMs. Hope this was helpful, enjoy!


Comments