VCF Automation: Assigning VM DNS Name and VM Display Name in Blueprints
- Brock Peterson

- May 8
- 1 min read
We've discussed VM Names using VCF Automation previously:
I found a more efficient way to do this via two Blueprint Properties: name and hostname. My Blueprint requires the user to input both values, it looks like this (all screenshots here are taken from VCF Automation 8.18.1).
# Created by Brock Peterson.
formatVersion: 1
inputs:
vm_display_name:
type: string
description: VM Display Name
title: VM Display Name
vm_dns_name:
type: string
description: VM DNS Name
title: VM DNS Name
Later on in the Blueprint I use this input to assign VM Properties.
Cloud_vSphere_Machine_1:
type: Cloud.vSphere.Machine
properties:
image: ${input.os}
cpuCount: ${input.vcpuCount}
totalMemoryMB: ${input.totalMemoryMB}
name: ${input.vm_display_name}
hostname: ${input.vm_dns_name}
vm_snapshot: ${input.vm_snapshot}
notes: ${input.notes}
owner: ${input.owner}
description: ${input.description}
category: ${input.category}
vcpu: ${input.vcpuCount}
memoryMB: ${input.totalMemoryMB}
constraints:
- tag: account:alderstead.vcfops.lab / Datacenter-1
networks:
- network: ${resource.Cloud_Network_1.id}
assignment: static
ip_addresses: ${input.ip}
If you want the full Blueprint you can get it here.
Requesting a VM via Service Broker Catalog looks like this.

Notice I ask for both the VM Display Name and the VM DNS Name from the requester. Upon completion, my VM looks like this in vCenter, exactly what I wanted.

Pro-Tip: in order to get the VM Display Name without characters/numbers appended at the end I had to put a Custom Naming template in place on the Project I was deploying into, it looks like this.
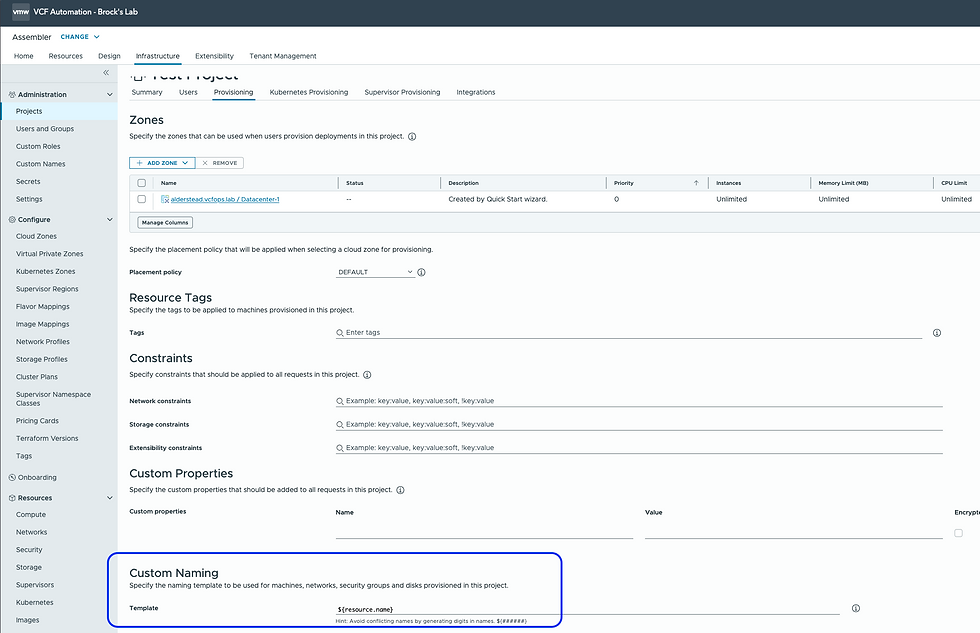
Thanks to my teammate Cosmin Trif for the suggestion on Custom Naming within the Project, if you haven't seen his blog I'd highly recommend it here. Hope this was helpful, enjoy!


Comments